Edit social videos with AI, no editor needed
Turn a raw phone clip into a polished, on-brand social video without ever opening a video editor. You talk to Claude Code in plain English. The video-use skill cuts the dead space, adds captions, can set it to music, and exports a clip ready to post. Use your own footage, logo and brand colours, and follow along start to finish.
An example of the result: cropped to vertical 9:16, filler and dead space cut, brand-coloured captions burned in, a logo added, and a gentle colour grade. Yours comes out in your own colours and style.
video-use is a free, open-source editing tool that runs inside the Claude Code desktop app. It lives on GitHub (a public code library), and Claude downloads it for you in Step 3, so you never need a GitHub account. It cuts and exports the video; posting to social is a separate step. This gets you the finished clip, fast and on-brand.Before you start
- The Claude Code desktop app (Windows or Mac), signed in.
- An ElevenLabs API key (Step 1). It reads the words in your video.
- A folder with your own clip to edit (Step 5). A logo, brand note and music track are optional.
1Get your ElevenLabs API key
- Log in at elevenlabs.io.
- Bottom-left, click Developers, then the API Keys tab.
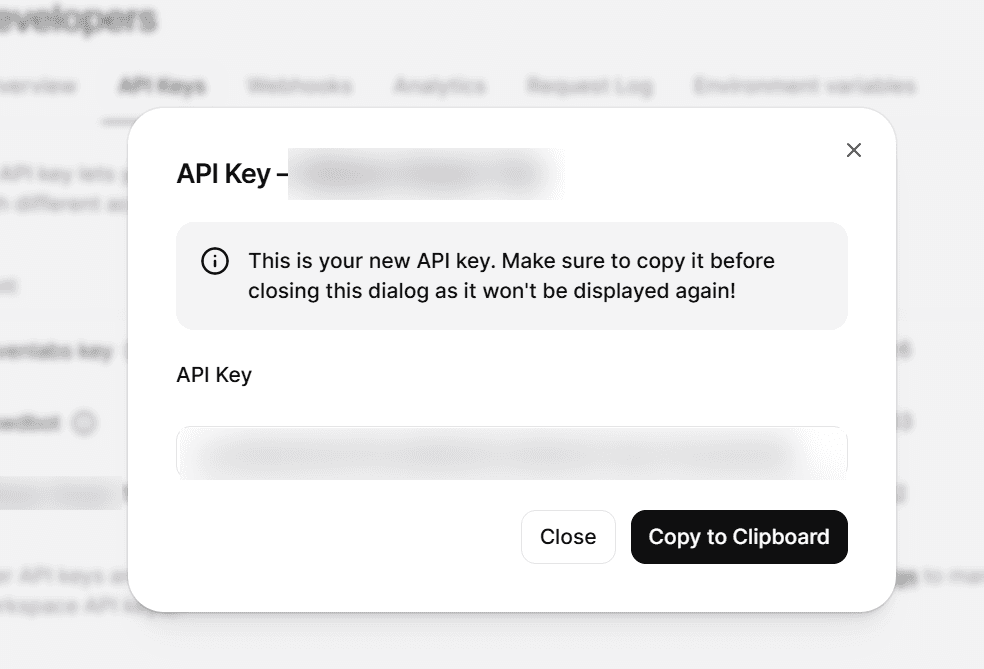
- Click + Create Key (top right) and give it a name.

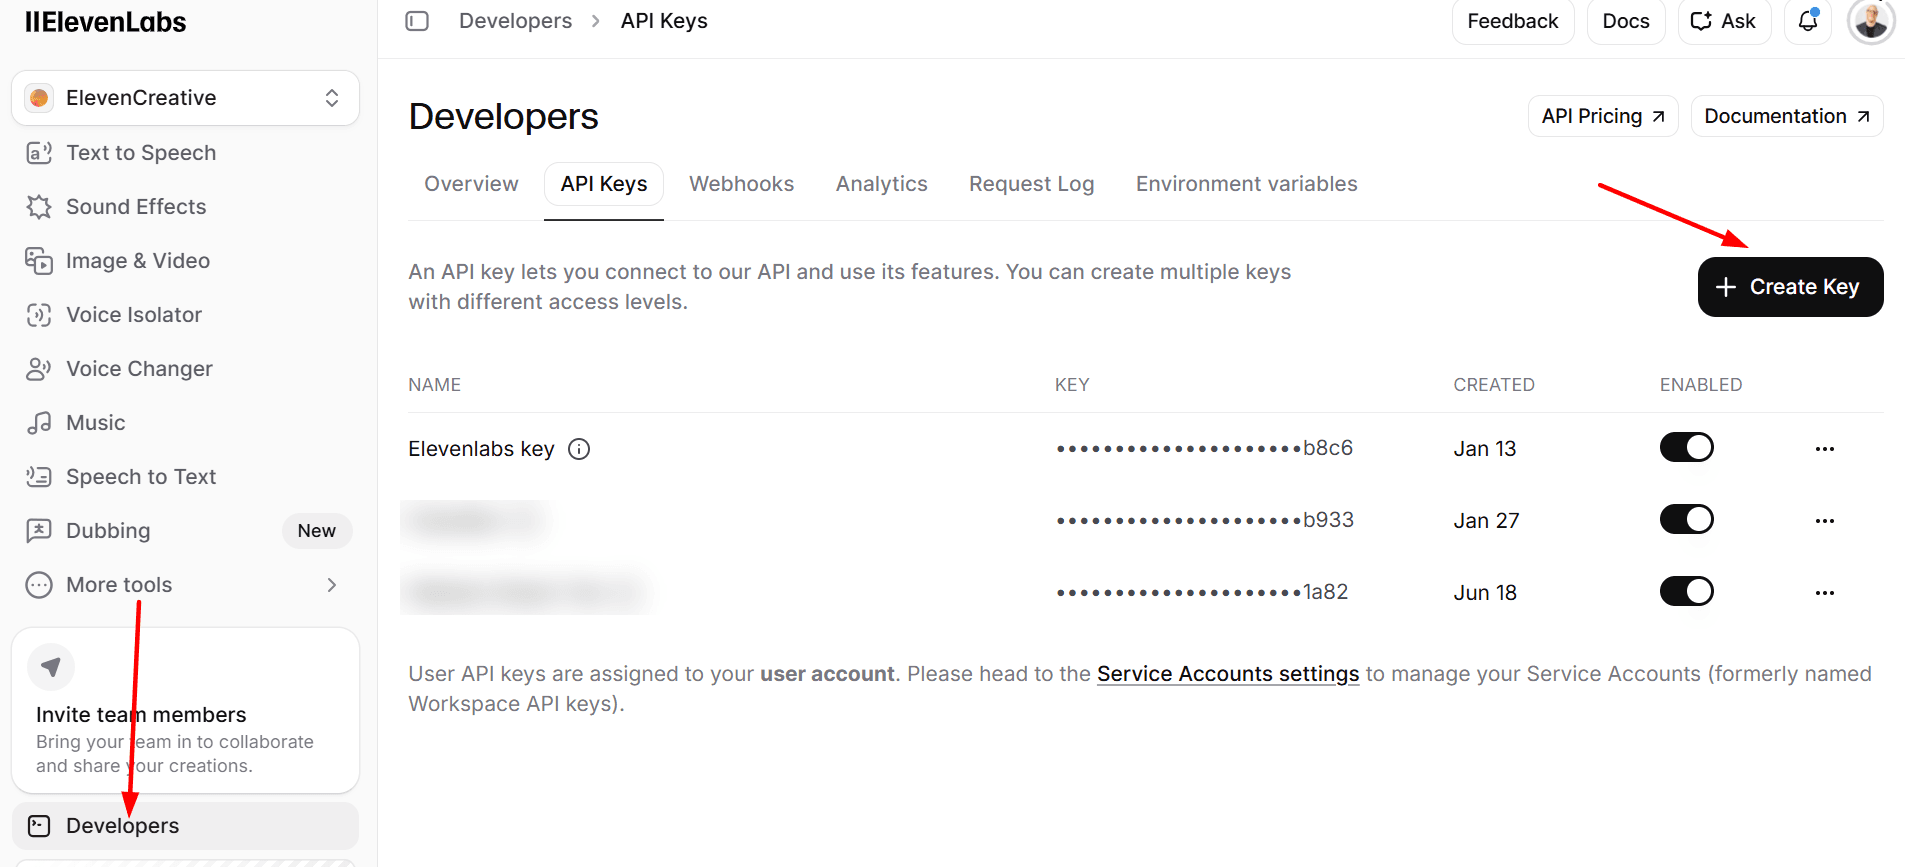
A box shows your new key. Copy it now, it is only shown once.
2Open Claude Code and trust the folder
- Open the Claude Code desktop app and go to the Code tab.
- Set the environment selector (top of the prompt box) to Local.
- When it asks Trust this workspace?, click Trust Workspace. This lets it read and edit files in that folder.
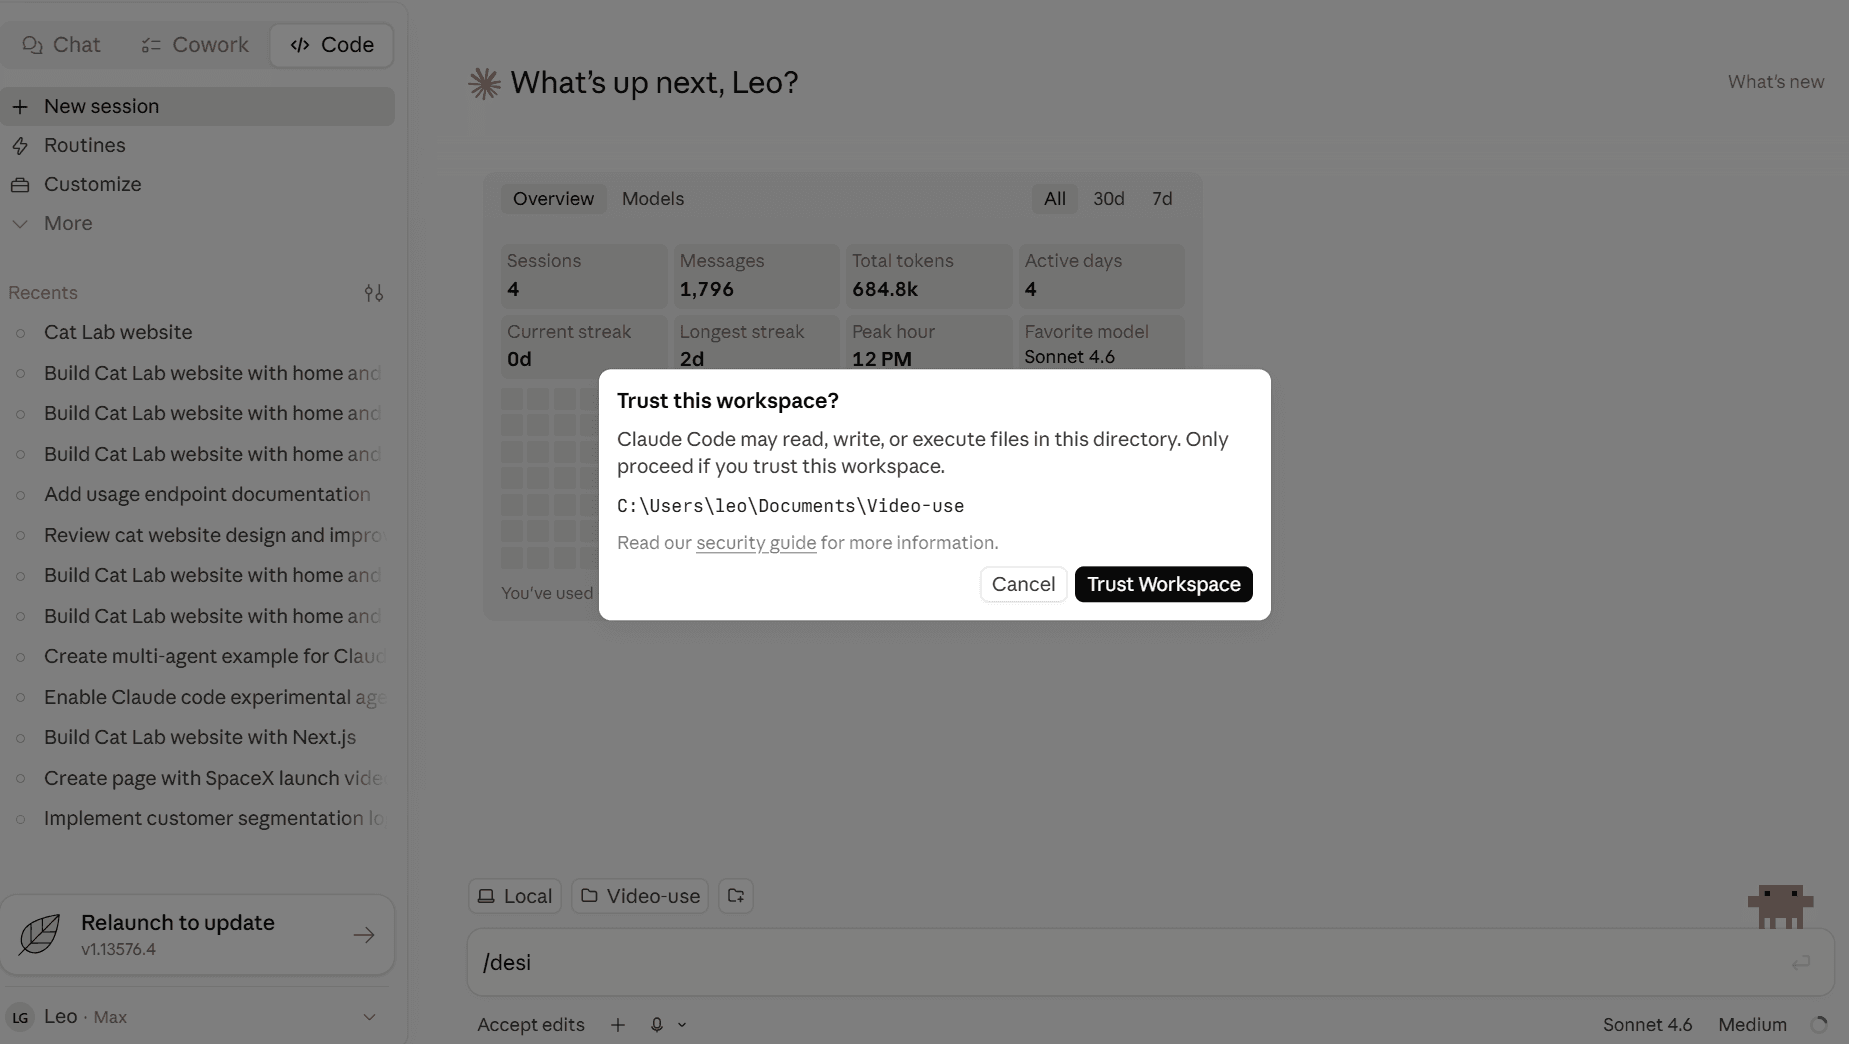
Documents\Video-use, you never edit videos there. Your videos live in a separate project folder that you set up in Step 5. Whichever folder you open, click Trust Workspace when asked.3Install & set up video-use (one time)
In the Code tab, paste this and click Approve on the prompts that appear:
Set up https://github.com/browser-use/video-use for me. I'm on Windows. Install ffmpeg and uv too if they're missing, and adapt any Mac-only steps for Windows.
This installs the tool from github.com/browser-use/video-use. It's free and open source, and you don't need a GitHub account, Claude clones it for you.
Claude installs everything and downloads the tool. Near the end it stops and hands you one line to run yourself, because it isn't allowed to link a tool into its own skills folder (a safety rule). This is the only command a human types.
- Press Win + X, then click Terminal.
- Paste this entire line (start at
New-Item) and press Enter:
New-Item -ItemType Junction -Path "$env:USERPROFILE\.claude\skills\video-use" -Target "C:\Users\YOU\Documents\Video-use"
-Target path must point to where Claude downloaded the tool, it tells you the path in Step 3. Swap the C:\Users\YOU\Documents\Video-use part for yours.Back in the app, tell it: done, the junction is created.
4Add your ElevenLabs key
Open the .env file in your video-use folder (Documents\Video-use\.env) and paste your key on its own line:
ELEVENLABS_API_KEY=paste_your_key_here
Don't want to touch files? Just tell Claude in the Code tab and it will do it for you:
Put my ElevenLabs key in the video-use .env as ELEVENLABS_API_KEY: PASTE_YOUR_KEY_HERE
Without this key it can't read the words in your video, so it won't run.
5Set up your own project folder
Make a new, empty folder for this job and drop in your raw video. That is the only file you need to start. Add a logo and a short brand note when you want the edit to come out as yours:
my-clip/
  raw.mp4            your video (any name, any length). The only file you need.
  brand/             optional. Makes the edit match your brand.
    brand.md         your brand note (template below)
    logo.png         your logo (PNG with a transparent background works best)
  music.mp3          optional. A track to play behind it (see "Music is optional").
Create brand/brand.md and fill in your own details. Claude reads this and follows it, so the captions, colours and logo all match your brand:
# Brand guide

Colours:
- Primary (captions + accents): #198FFF
- Text on video: #FFFFFF

Fonts:
- Captions / headlines: Montserrat Bold

Captions:
- Style: bold, 2 to 3 words on screen, word-by-word highlight
- Position: centred, lower third, inside the safe margins

Logo:
- File: logo.png
- Placement: top-right, small

Tone: punchy and friendly
In the Code tab, open this folder, and make sure the environment is set to Local.
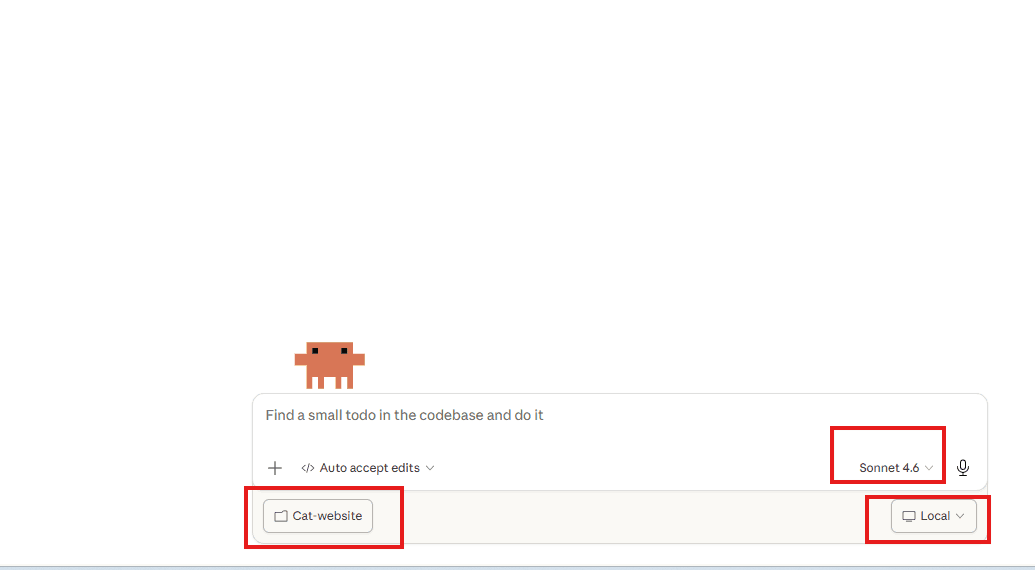
brand folder out and the prompt will use clean, neutral captions. Add your branding later and run it again.6Tell it to edit (the prompt)
This is the part that matters. Paste this prompt as-is for a punchy 15-second vertical clip. Change the bits in [BRACKETS] only if you want something different:
Use the video-use skill on the clip(s) in this folder.

GOAL: Turn this into a punchy 15-second vertical social clip that grabs attention in the first second.

FORMAT: 9:16 vertical, for Reels / TikTok / Shorts.
LENGTH: 15 seconds, hard cap. Pick the strongest moments and build the clip around them.
HOOK: Open on the single best line or visual.

EDIT:
- Cut all filler (um, uh, like), false starts and dead space. Snap every cut to a word boundary.
- Keep only the best takes. Tighten hard to hit 15 seconds without feeling rushed.

MUSIC + RHYTHM:
- Cut to the rhythm of the speech so the edit feels tight.
- If there is a music track (music.mp3) in this folder, also add it as a background track, duck it under any speech, detect its beat and cut on the beat. Don't add any music I haven't supplied.

CAPTIONS:
- Burn in captions: bold, 2 to 3 words on screen at a time, word-by-word highlight, centred and inside the safe margins.
- Match the caption colour and font to brand/brand.md.

BRAND + LOOK:
- Follow brand/brand.md and use the assets in brand/ (logo, colours, fonts).
- Place the logo small in a corner. Apply a clean colour grade in the brand colours, keep skin tones natural.

Propose the plan in plain English first and WAIT for my OK before rendering.
Then render to edit/final.mp4, watch it back, fix any off-beat cuts or caption timing, and save the setup to project.md so the next clip matches.
Then it's a conversation: it transcribes the audio, proposes a plan, you say yes go, it renders, and you tweak in plain English (“subtitles bigger”, “tighter at 0:08”, “logo smaller”, “cut harder on the beat”).
edit/final.mp4 inside your folder. Keep the app open while it renders.What it can & can't do (vs CapCut)
It beats CapCut at the hard, repetitive part, the cutting, on-brand captions and music timing, fast and automatic. It isn't a drag-and-drop sticker editor.
| Feature | video-use? |
|---|---|
| Smart cutting (filler / dead-space removal, best takes) | Yes, its strength |
| Cut to the beat of the music | Yes, detects beats with code |
| Branded captions / subtitles | Yes, strong |
| Colour grading + logo overlay | Yes |
| Custom motion graphics (counters, kinetic text) | Yes, generated with code |
| Transition packs (swipe / zoom / glitch) | No library (custom only) |
| Sticker / emoji / GIF store | No, but it can overlay one you supply |
| Filters store, green screen, auto-reframe | Not built in |
| Drag-and-drop timeline | No, you direct it in plain English |
Music is optional
You don't need to supply a track. With no music, it cuts to the rhythm of your speech. Want a track behind it? You already have an ElevenLabs account from Step 1, so generate one there instead of hunting for royalty-free clips.
- In ElevenLabs, open Music, describe the vibe you want, and download the track (paid plans). It's royalty-free and yours to use.
- Drop that file in your project folder as
music.mp3. The prompt already tells Claude to set the cuts to its beat. - A track with a clear, steady beat gives the best beat-synced edit. Big drops and tempo changes are harder to cut to. Generating music is a separate step, not built into video-use.
The 3 golden rules
- Describe, don't micro-direct. Give it the brief and let it propose the cuts.
- Make it propose a plan first, then approve. It's built to wait, use that.
- Iterate in plain English. “Subtitles bigger”, “tighten 0:08”, “cut harder on the beat”.