Build a Website with Claude Code
From brainstorm to working app, using plain English. No coding experience needed.
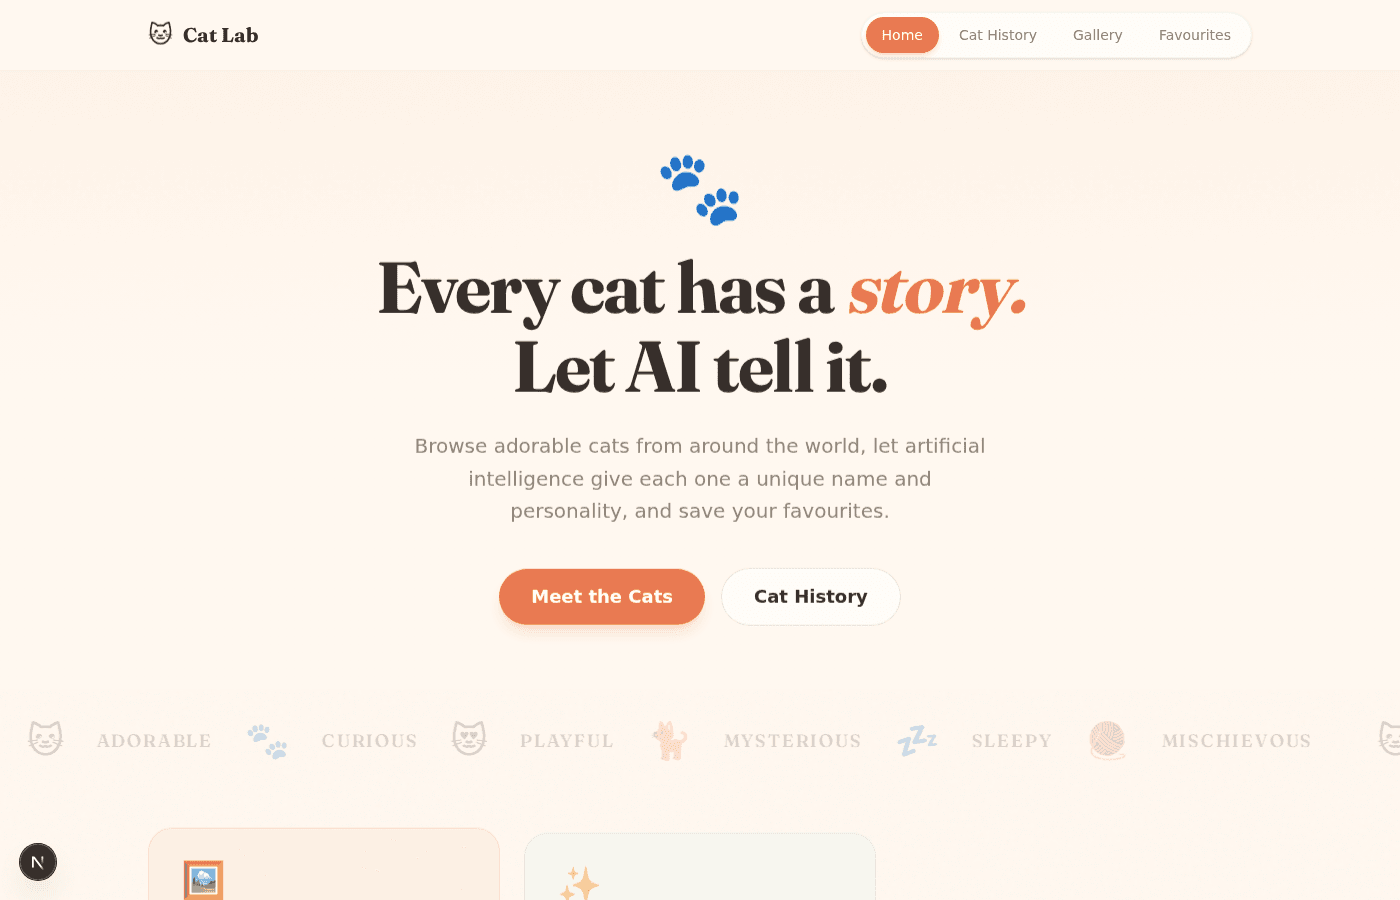
This is what we're building, a full cat website with AI-powered features, built from a single prompt.
See the Live Website →Before You Start
Three things to set up before we begin.
Install Node.js
Go to nodejs.org and download the LTS version (the big green button). Run the installer and click Next through everything.
Node.js is the engine that lets you preview your website on your computer (localhost). Without it, Claude Code can't install packages or start the dev server.
Create Your Project Folder
Go to your Documents folder and create a new folder called Cat-Website. Leave it empty. Claude Code will fill it.
This is where your entire project will live.
Open Claude Code
Open the Claude Desktop app and click the Code tab at the top. Then check these three things:
Folder (bottom left), select your Cat-Website folder
Model (bottom right), set to Sonnet 4.6
Local (bottom right), make sure it says Local, not Remote

Brainstorm What to Build
Before you touch Claude Code, write down what you want. Pretend you're briefing a developer. This is the most important step, the brainstorm IS the prompt.
Before you write your brainstorm, run it through these 5 checks
This is how the best prompts are built. Skip these and Claude guesses. Use them and Claude understands exactly what you want.
Scope it
Define the boundaries. What exactly are you asking Claude to do? Not vague, not everything at once.
Diagnose it
Don't just describe what's broken. Explain why it matters and what's causing it. Give Claude the context to solve the right problem, not just the symptom.
Explore first
Tell Claude to investigate before acting. Read the code, understand the system, ask questions. Don't jump straight to building.
Define done
What does success look like? Be specific about the output you expect, the format, the criteria.
Verify it
How do you check it worked? Tell Claude to test, validate, or verify its own output before calling it done.
Scope it → Diagnose it → Explore first → Define done → Verify it
Five checks. Every prompt. Every time.
As a class, we'll build this list together:
A website about cats
A home page with a welcoming hero section and cat photos
A 'Cat History' page with real content, how cats were domesticated, famous cats, fun facts
A gallery that pulls live cat images from The Cat API (a free public API)
A 'Name This Cat' button, when clicked, AI looks at the photo and generates a creative name and personality
A heart/favourite button on each cat that saves it
A 'My Favourites' tab to see saved cats
Claude API integration with the key stored in a .env file
Clean, modern, playful design
See what just happened?
That brainstorm hit all 5 concepts, it's scoped (a cat website), has context (APIs, design style), defines done (specific pages, buttons, features), and Claude will verify it builds cleanly. You didn't write code. You described what you wanted. The brainstorm is the skill.
Plan Mode. Let Claude Think First
Switch to Plan mode , click the dropdown next to the + button at the bottom left.
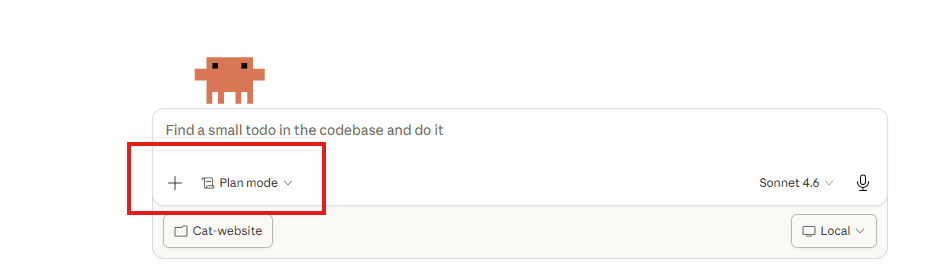
Now paste your brainstorm as a raw list, no special formatting needed. We tell Claude to take our rough ideas and organise them into a structured plan using the Role / Task / Format / Context framework:
Here's what I want to build. A website called "Cat Lab":

- A welcoming home page with big cat photos and cards explaining the features
- A "Cat History" page with real researched content about how cats were domesticated, famous cats, fun facts, presented as a visual timeline
- A gallery that pulls live cat photos from The Cat API (https://api.thecatapi.com/v1/images/search), 12 at a time with a "Load More" button
- A "Name This Cat" button on each image that sends the photo to the Anthropic Claude API using vision to generate a FUNNY, QUIRKY name and a one-sentence personality with character — think absurd puns, ridiculous backstories, comedy wordplay, things that make people actually laugh out loud. Not generic ("Whiskers the curious cat"), not boring. Be weird, be specific, be brave.
- A heart/favourite button that saves cats to the browser
- A "My Favourites" tab to see saved cats
- API key stored securely, not in the code
- A CLAUDE.md file documenting the project
- Warm, playful, professional design, like a modern cat blog, not a dark tech dashboard
- Mobile friendly
- The AI model for cat naming is claude-haiku-4-5-20251001

Take this brainstorm and organise it into a structured plan using this framework:

Role: [What role should you take?]
Task: [What exactly are you building?]
Format: [How should it be structured?]
Context: [What's the goal, audience, and design direction?]

Then show me your technical plan for how you'd build it before you start.

Definition of done: the job is finished when every feature in this list works end-to-end in the browser — not when the code compiles, but when I can open the site, click through every page, press every button, and see each feature actually doing what it's supposed to. If any feature is missing or broken, you keep going.What happens
Claude takes your rough brainstorm and does two things:
1. Structures your ideas , organises your messy list into a clean Role/Task/Format/Context prompt. You see how a professional brief looks.
2. Proposes a technical plan , chooses the right tools and architecture:
"I'll use Next.js with TypeScript for the framework"
"Tailwind CSS for styling"
"An API route at /api/name-cat for the Claude vision call"
"localStorage for saving favourites"
"Environment file (.env.local) for the API key"
Review the plan. You didn't need to know what Next.js or Tailwind is. Claude chose the right tools. Approve it and Claude starts building.
The key lesson
You wrote a rough brainstorm. Claude turned it into a structured brief AND a technical plan. You learn the framework by seeing it applied, not by filling it in yourself.
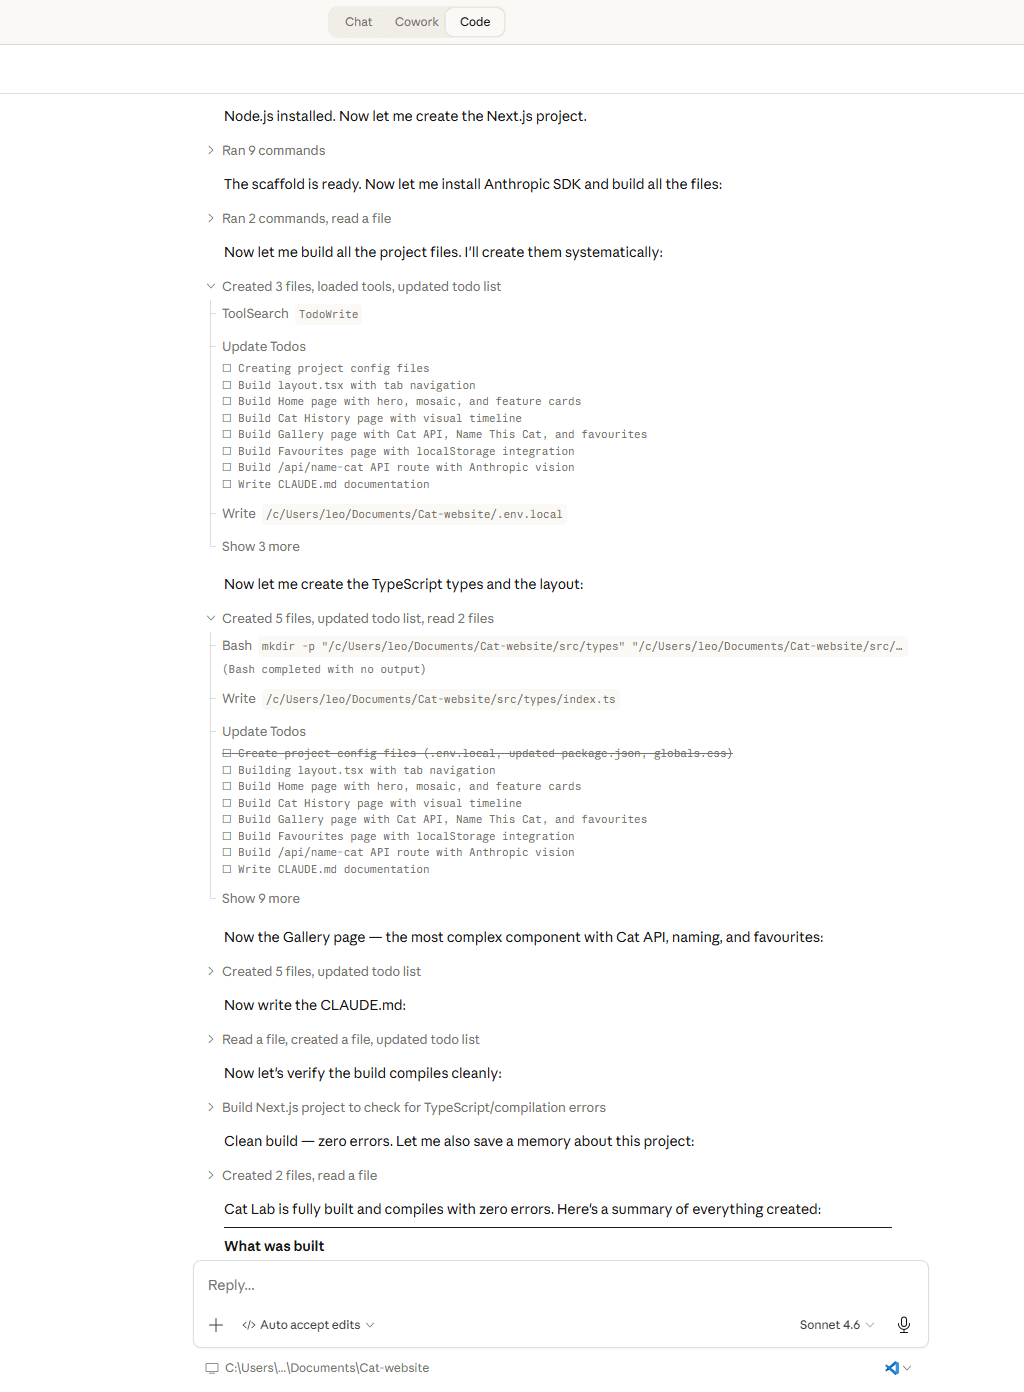
Watch it code.
Once you approve the plan, Claude Code gets to work. It creates files, installs packages, writes every component, researches cat history, builds the API route, all on its own.
Creates project config files
Builds layout with tab navigation
Writes the home page, gallery, history, and favourites
Connects The Cat API and Claude vision API
Writes CLAUDE.md documentation
Runs a build to verify zero errors
You wrote zero code. It built everything.
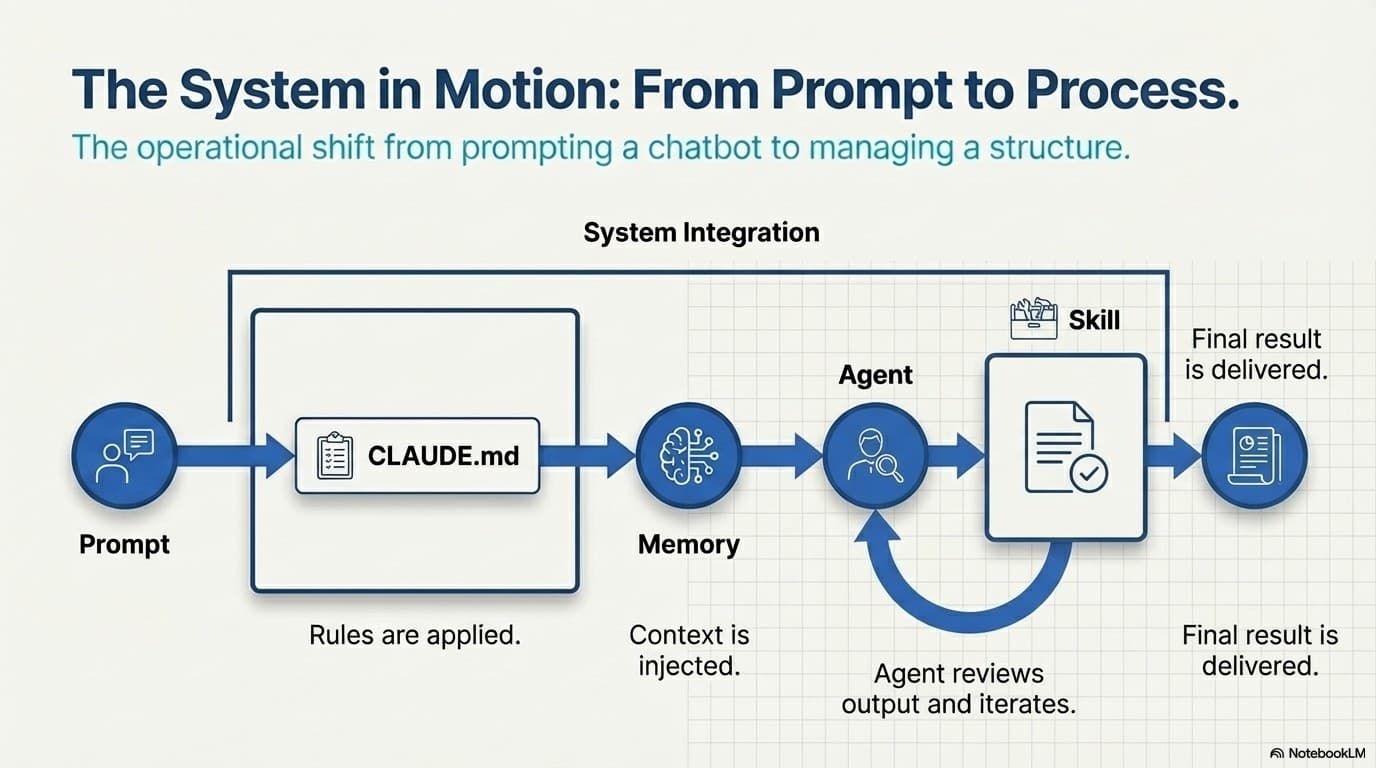
From Prompt to Process
This is what's actually happening under the hood. You're not just prompting a chatbot, you're managing a system.
Get Your Own API Key
What is an API key?
An API key is like a password that lets your website talk to another service. In this case, our cat website needs to send cat photos to Claude (Anthropic's AI) and get back a name and personality. The API key tells Anthropic “this request is from an authorised user.” Without it, the AI won't respond.
You'll need your own API key from the Claude Console. It uses the same login as your paid Claude account, and new accounts get $5 in free credits to start.
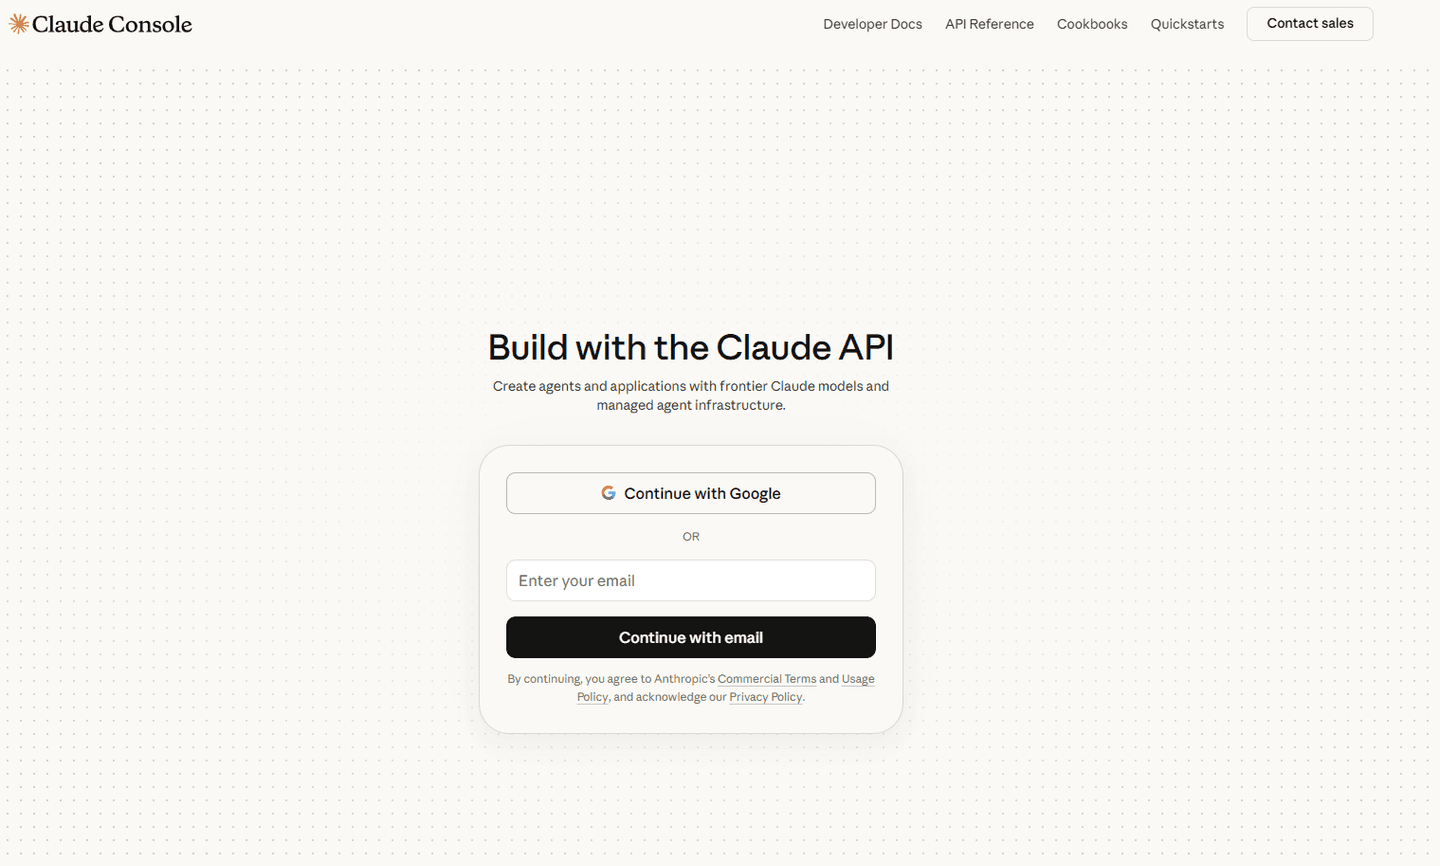
1. Sign in to the Claude Console
Open console.anthropic.com/login and sign in with the same Google account or email you use for your paid Claude account.
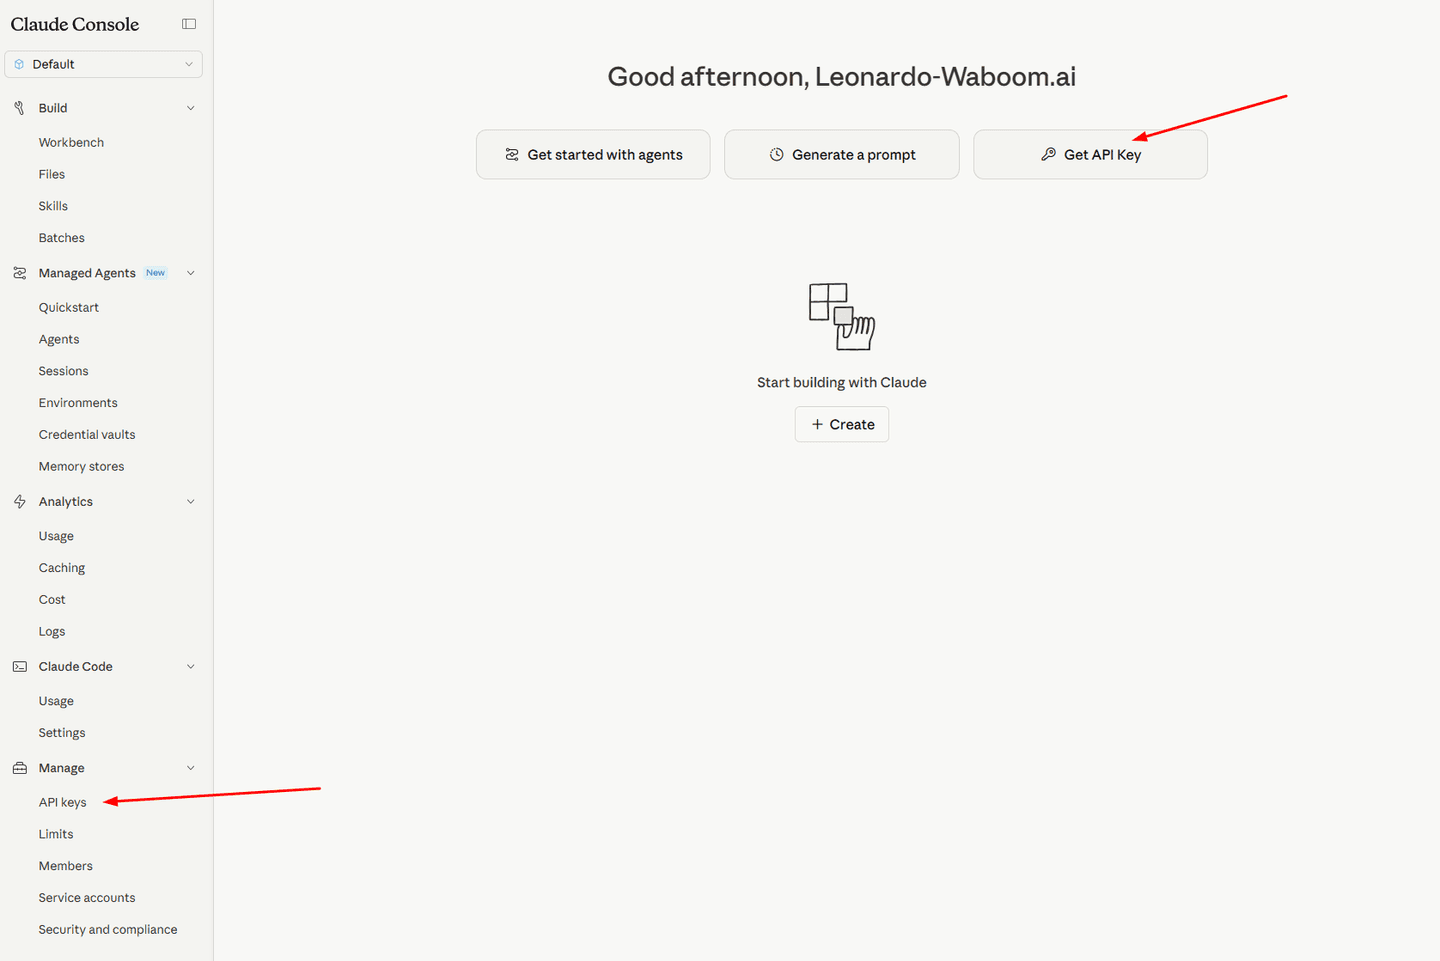
2. Open the API keys page
On the dashboard, click Get API Key at the top right (or API keys under Manage in the left sidebar).
3. Create a new key
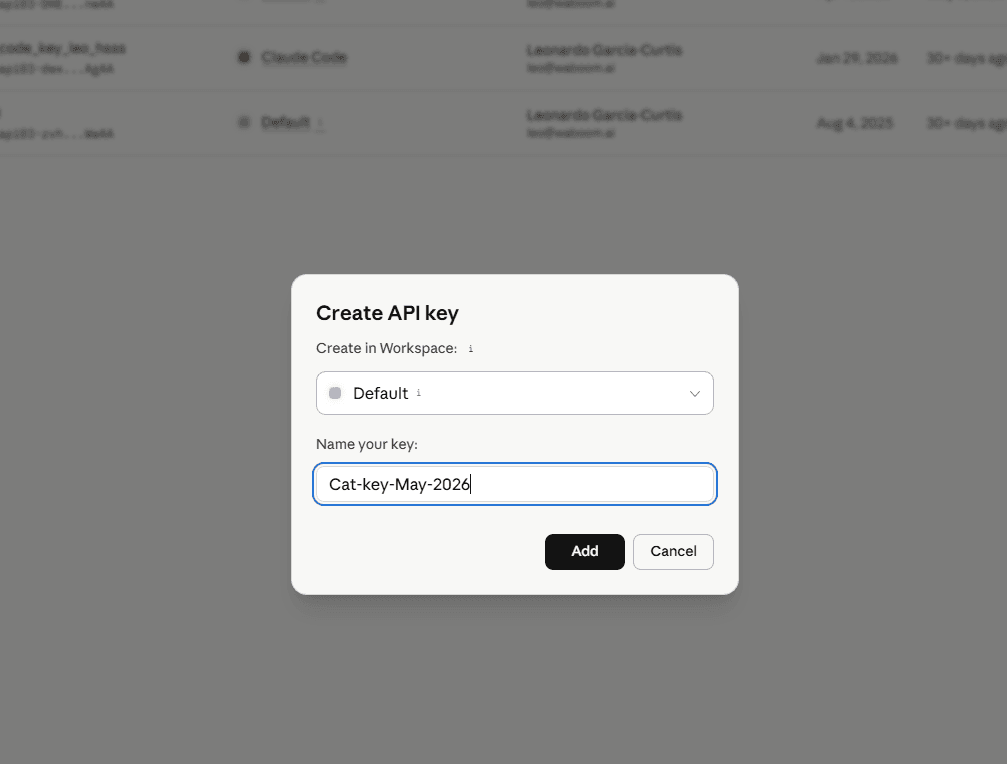
On the API keys page, click the black + Create key button at the top right.
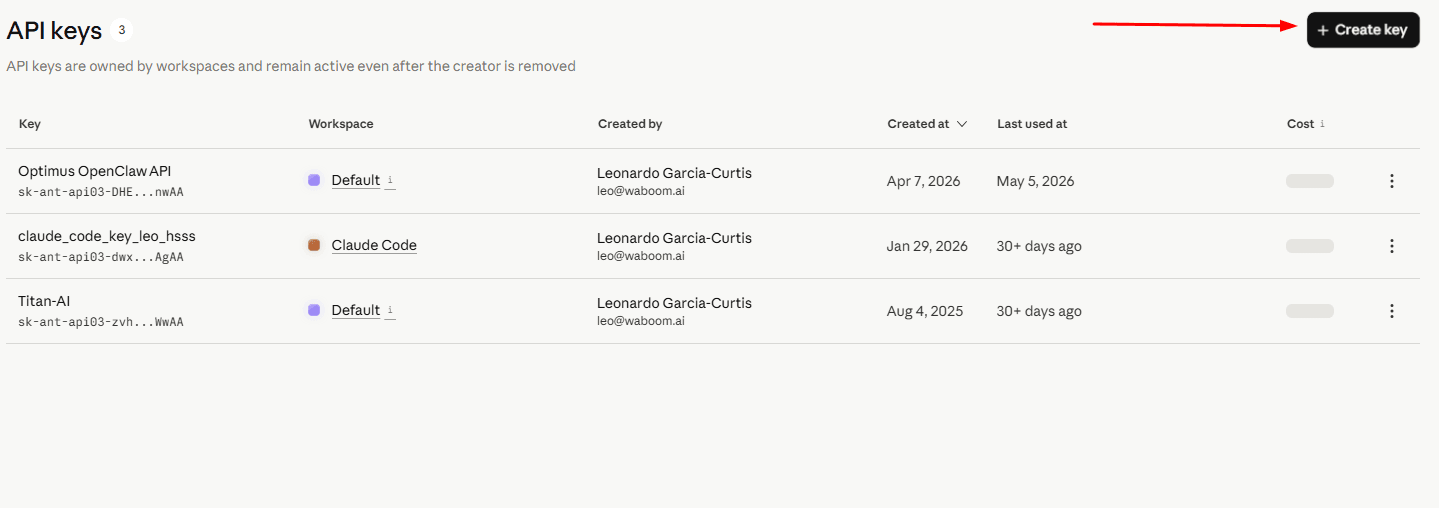
Leave the workspace as Default, and give the key a name you'll recognise — for this workshop, something like Cat-key-May-2026. Then click Add.
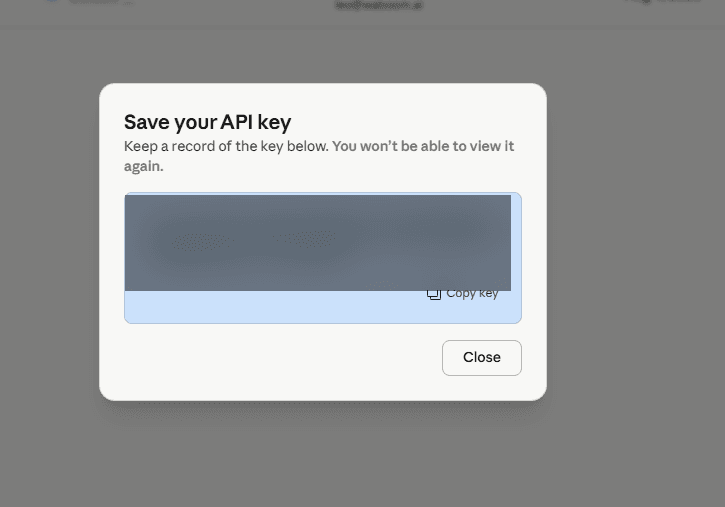
4. Copy the key right now
Click Copy key and paste it somewhere safe (a sticky note, a doc). You will not see this key again after you close this dialog. If you lose it, you just create a new one.
Now wire the key into your cat website
You've got two ways to do this. The first is fastest. The second teaches you what's actually happening — pick whichever you prefer.
Let Claude Code handle it
In your Claude Code window (the one already open in your Cat-Website folder), paste this prompt and then your key:
Here's my Anthropic API key. Add it to .env.local as ANTHROPIC_API_KEY in this Cat-Website project, and make sure .env.local is in .gitignore so it never gets committed. The Name This Cat feature should read it via process.env.ANTHROPIC_API_KEY.

KEY: [paste your sk-ant-... key here]
Claude will create or update .env.local, confirm it's in .gitignore so you never commit it by accident, and wire it into the AI feature. The dev server will pick it up when you start it in the next step.
Paste it into the file yourself
In your project folder (e.g. Documents/Cat-Website), find or create a file called .env.local in the root. Open it in any text editor and add this single line:
ANTHROPIC_API_KEY=sk-ant-api03-...your-key-here...
Why this file?
- Next.js automatically reads
.env.localand exposes it to your code asprocess.env.ANTHROPIC_API_KEY. - It's gitignored by default, so the key never ends up in GitHub, Vercel, or anywhere public.
- Never paste a real API key directly into your code — always reference it through an env var.
Save the file. Next.js will read it automatically when you start the dev server in the next step. If your server is already running, stop it (Ctrl+C in the terminal) and run npm run dev again so it picks up the new value.
Having trouble? Use mine.
If you're stuck creating your own key, here's a workshop key you can use to keep going. Swap to your own afterwards.
This key is for workshop use only.
Start Your Dev Server
Once Claude Code finishes building, you need to see your website. Ask Claude Code to start it:
Start the dev server so I can see the website in my browser
What happens
Claude Code runs npm run dev and gives you a URL (usually localhost:3000). Open that URL in your browser and you'll see your cat website live. Every change Claude makes from here updates in real time.
Test the AI Feature
Open the Gallery tab in your browser and click “Name This Cat” on any cat photo. Watch as:
The button shows "AI is thinking..." with a spinner
The image is sent to the Claude API (vision model)
Claude looks at the actual photo and invents a name
A name and one-sentence personality appear below the image
You can heart it to save it to your Favourites
This is the moment
You just connected AI vision to a live website using plain English. No ML knowledge. No model training. One prompt built the whole thing.
Understanding Project Files
Claude Code created several key files that make everything work. Understanding these is how you go from following prompts to building your own projects.
CLAUDE.mdProject Rules & ContextYour project's rulebook. It documents the tech stack, APIs, design rules, and standing instructions. Every time you open Claude Code in this folder, it reads this file first and follows whatever's in there. You never have to re-explain your project.

.env.localSecretsWhere your API keys and sensitive data live. This file is never shared or uploaded, it stays on your machine only. That's why the API key goes here instead of directly in the code.

package.jsonDependenciesThe list of tools and libraries the project uses. Claude Code installs these automatically. Think of it as the “ingredients list” for your project.

memoryPersonal MemoryClaude Code can save things it learns about you and your preferences across conversations. If you tell it “I prefer dark themes” or “always use UK English”, it remembers for next time. It's like CLAUDE.md but for YOU, not the project.

Claude DreamBackground MaintenanceClaude Dream (officially AutoDream) runs between your coding sessions, like a cleaner that comes in overnight. It reorganises and tidies up Claude's memory and project context so things don't get bloated over time.
Without it, a project's history can grow so cluttered that Claude starts performing poorly. Dream prevents that, it keeps your project lean and your AI sharp, automatically.

Install the Design Plugin
What are plugins?
Plugins are pre-built skills made by Anthropic or the community that give Claude Code specialised abilities. Instead of writing a long prompt explaining how to design a website, you install a plugin and it already knows best practices.
What does the Design plugin do?
It's a full design partner. Built by Anthropic to handle the parts of design work that usually need a specialist:
- Critique — reviews any page or component and tells you what's working and what isn't
- Design system management — keeps colours, spacing, typography consistent
- UX writing — rewrites buttons, headings, error messages
- Accessibility audits — finds contrast, keyboard, and screen-reader issues
- Research synthesis and dev handoff — turns ideas into pixel-perfect specs
From rough exploration to finished, production-ready UI — the same kind of feedback you'd pay a senior designer for.
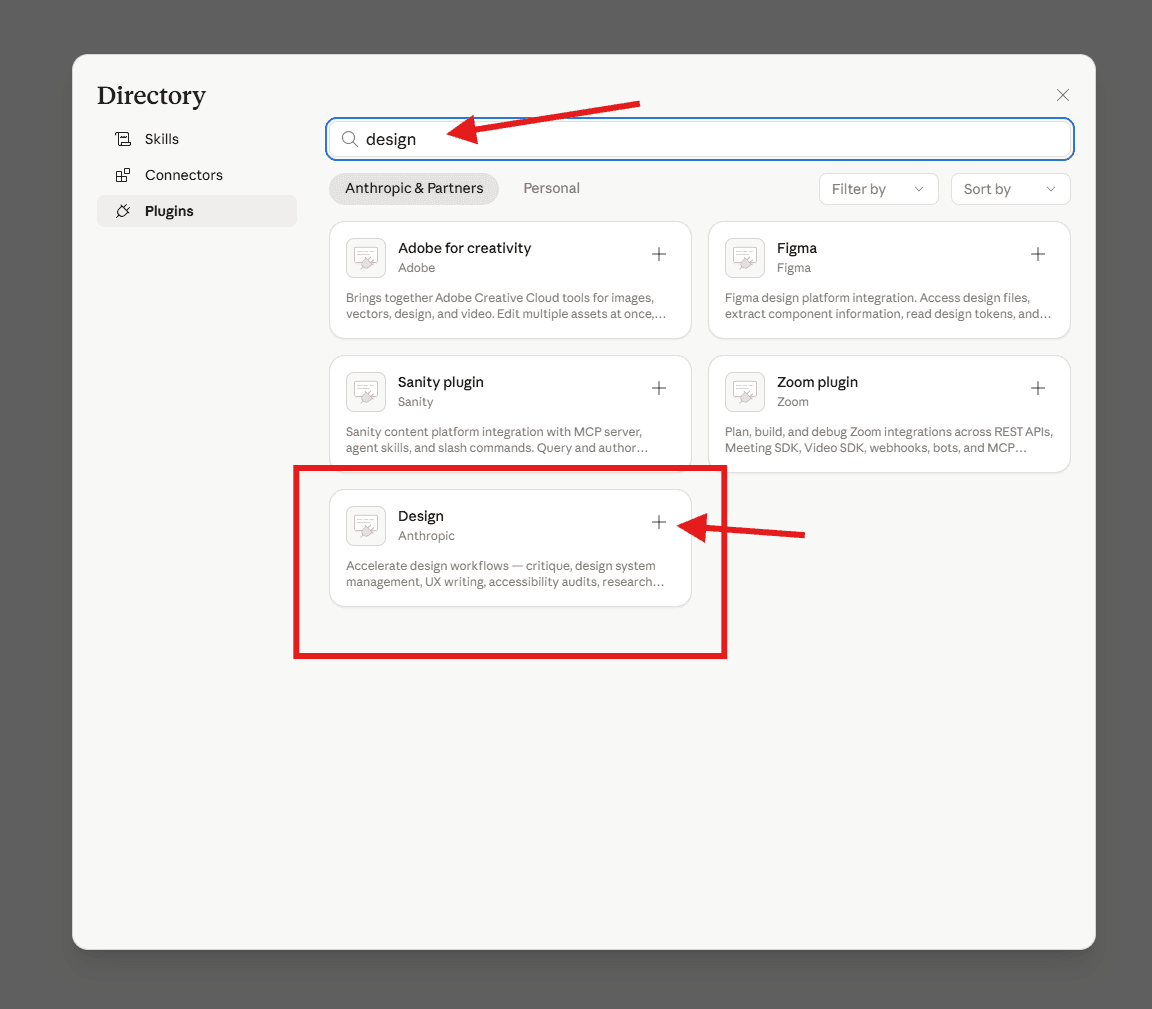
In Claude Code, go to Customize, then under Personal plugins click the + button and choose Browse plugins.
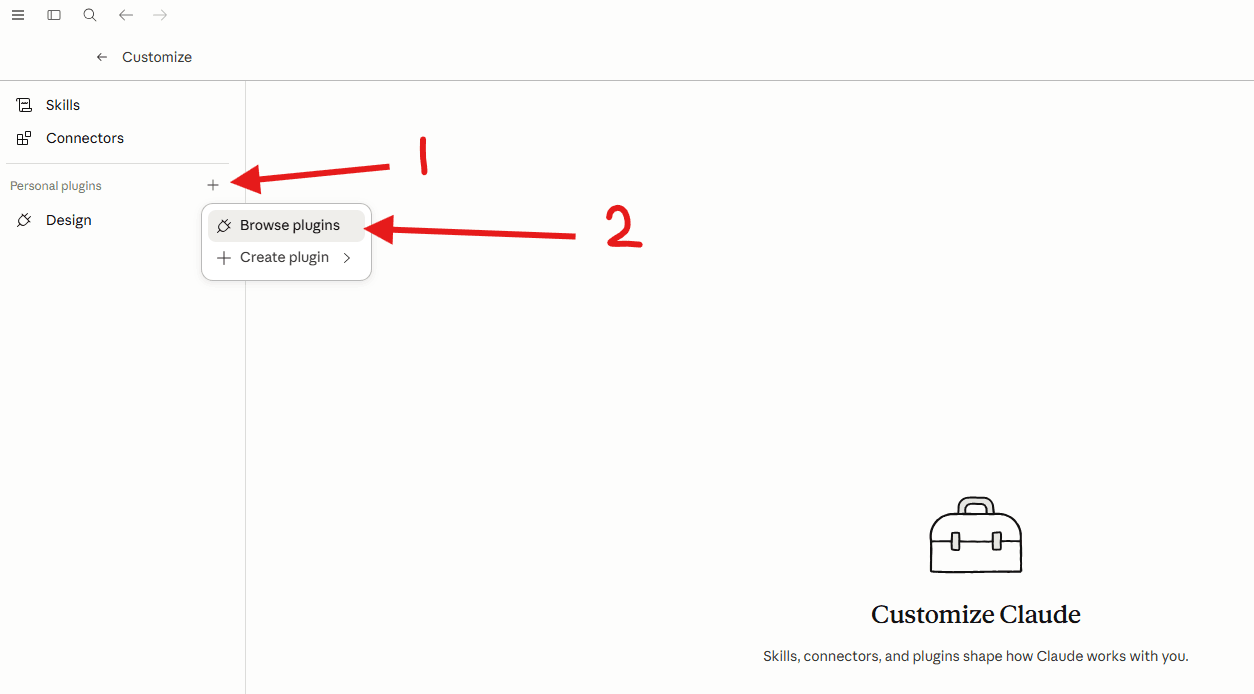
In the directory search box, type design. Find Design by Anthropic and click the + to install it.
Now put it to work. In the chat, type /design and the plugin's sub-skills will appear — pick design-critique (this is the one that gives you structured feedback on usability, hierarchy, and consistency).

Once design-critique is selected, paste this prompt:
Critique my new cat website. Open it in the browser and walk through the home page, gallery, history page, and favourites tab. Tell me:

- What's working and what isn't (layout, spacing, typography, hierarchy, colour, motion)
- Any accessibility issues (contrast, focus states, alt text, keyboard nav)
- UX writing that could be sharper (buttons, headings, empty states)
- The top 5 changes that would make the biggest difference

Don't make any changes yet. Just give me your critique with specific examples and where on the site they appear. Then ask me which changes I want you to make.
What you'll see
The Design plugin reviews your site like a senior designer would — calling out specific spacing, type, contrast, and copy issues with examples. Then it waits for you to pick which fixes you want.
Tell it which ones to apply (or just say “do all of them”), refresh your browser, and compare. The same website, transformed by a specialised design agent.
The key lesson
Plugins give Claude Code superpowers. There are plugins for ads, project management, analytics, and more. You're not limited to what Claude knows by default — you can install an expert for whatever you're working on.
Homework: Launch a Team of Agents
This is your homework.
You've learned the fundamentals. Now try this on your own after the workshop. This is where Claude Code shows its real power, launching a team of agents that work together as peers, coordinating with each other on complex tasks.

How Agent Teams work
Agent Teams are different from regular sub-agents. Instead of one boss delegating to isolated workers, you get peers that coordinate with each other. Teammates can message each other directly, share findings, and agree on approaches before writing code.
This means complex parallel work that needs collaboration, like a designer and a developer agreeing on HTML structure before they each start building.
Before you start, enable Agent Teams
Agent Teams is an experimental feature. You need to add a flag to your Claude Code settings file. You can either edit the file manually or just ask Claude Code to do it for you (it will need to restart afterwards).
Add this to your settings.json:
{
  "env": {
    "CLAUDE_CODE_EXPERIMENTAL_AGENT_TEAMS": "1"
  }
}
Where is settings.json?
Mac / Linux: ~/.claude/settings.json
Windows: %USERPROFILE%\.claude\settings.json
Or just tell Claude Code: “Add the CLAUDE_CODE_EXPERIMENTAL_AGENT_TEAMS flag to my settings.json” , it will update the file for you. You'll need to restart Claude Code for the change to take effect.
Use TeamCreate to build an agent team for this project. Agents must coordinate with each other where tasks overlap.

Reviewer, audit the codebase and share findings with the whole team before anyone writes code

Gallery Redesigner, improve card layout, hover animations, gradient bg, loading skeletons. Agree on final card HTML with the Filter Builder before writing anything

Filter Builder, add a breed filter dropdown using https://api.thecatapi.com/v1/breeds. Agree on card HTML with the Gallery Redesigner before writing anything

Docs Writer, write README.md once the other three are done
What you'll see
Four agents spin up as a team. The Reviewer audits first and shares findings with everyone. The Gallery Redesigner and Filter Builder coordinate on shared HTML before building. The Docs Writer waits until the others finish. Real collaboration, not just parallel work.
You're not talking to a chatbot. You're managing a team.
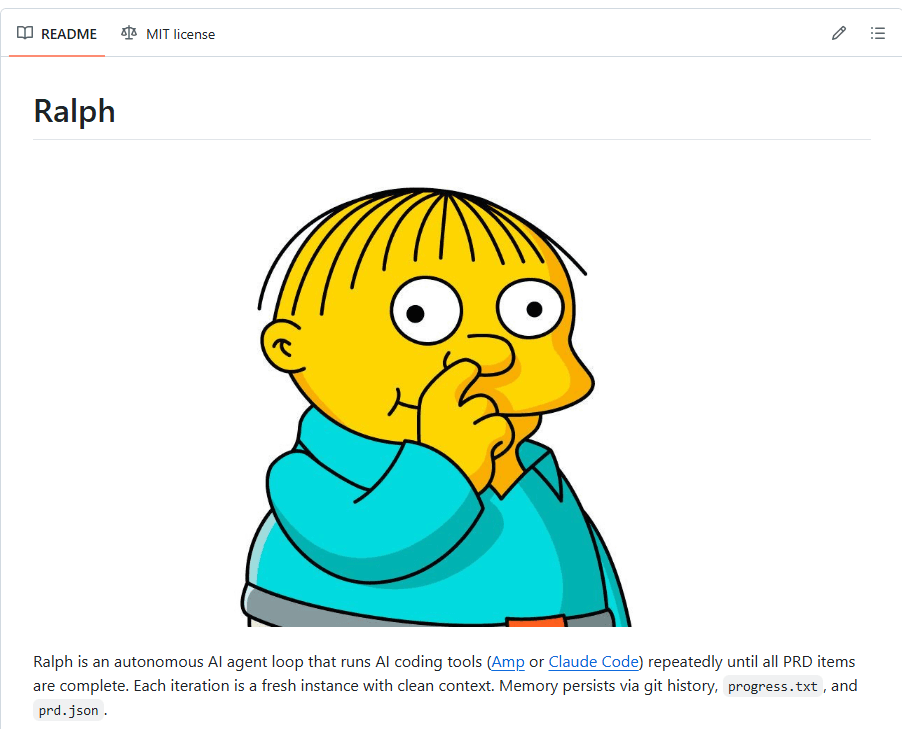
Bonus: The Ralph Wiggum Loop
What if you could describe what you want in plain English, and Claude would plan the entire build, break it into steps, execute them one by one, check each one actually works in the browser, and keep going until it's done?
That's the Ralph Loop. It's an autonomous agent loop, you give it a description, it creates a structured plan (a PRD with user stories), then executes each story in order, verifying in the browser after each one before moving to the next. It doesn't stop until every story passes.
Step 1. Install the Ralph connector
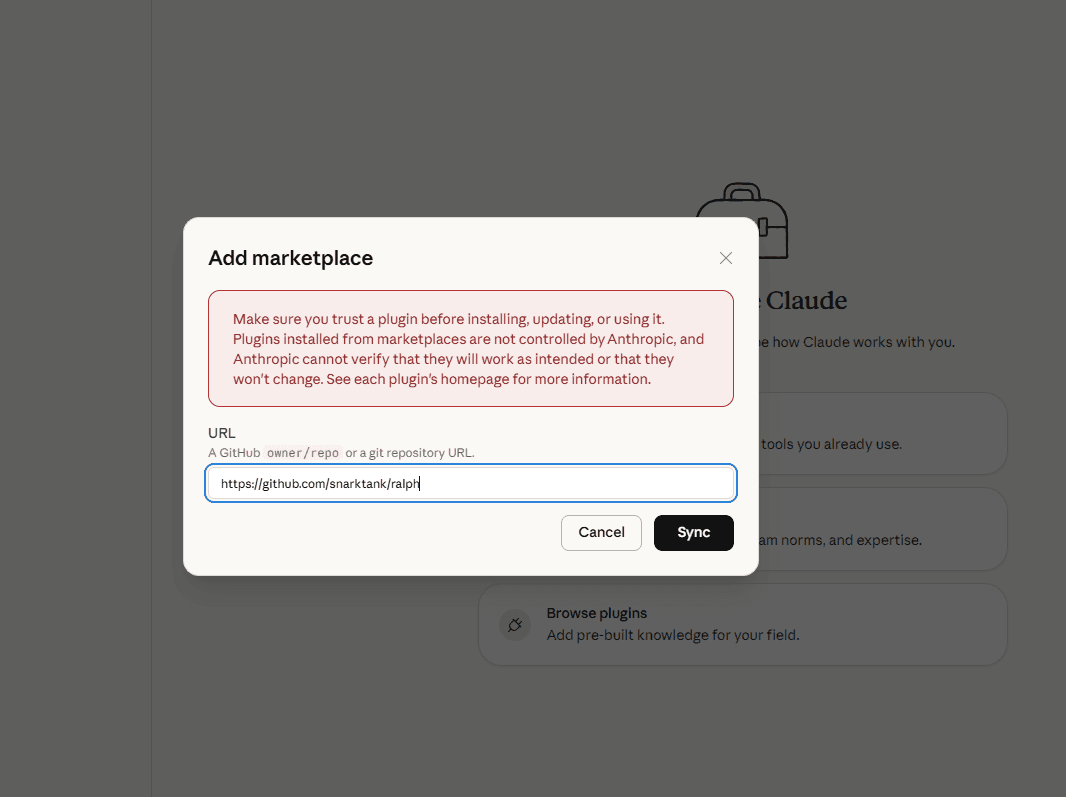
Ralph is a custom Claude Code connector (plugin). To install it, open Claude Code settings and add a new marketplace using the GitHub repo URL.
1. Go to Customize → click the + next to Personal plugins → Add marketplace
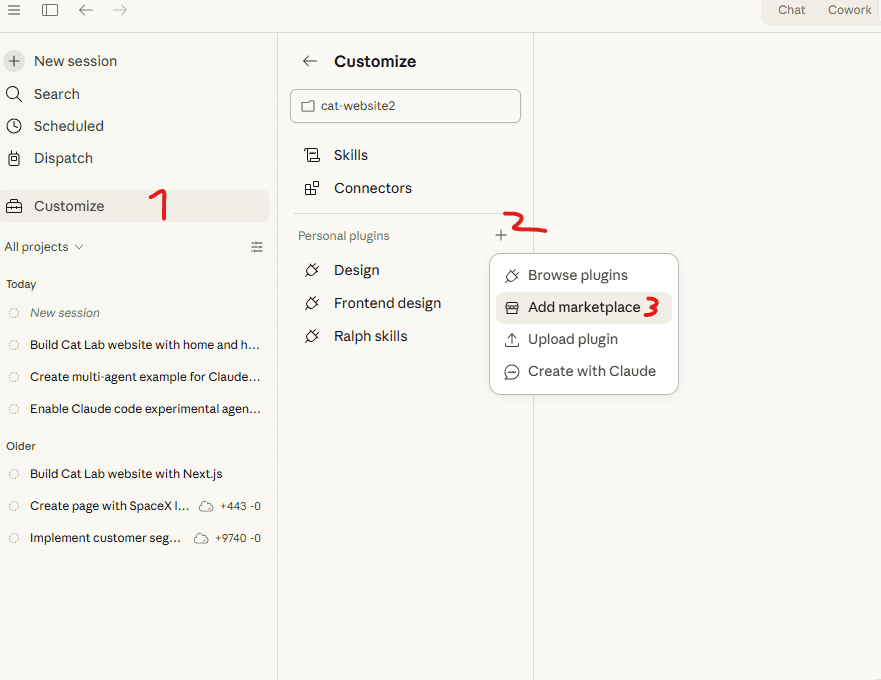
2. Paste this URL and click Sync:
https://github.com/snarktank/ralph
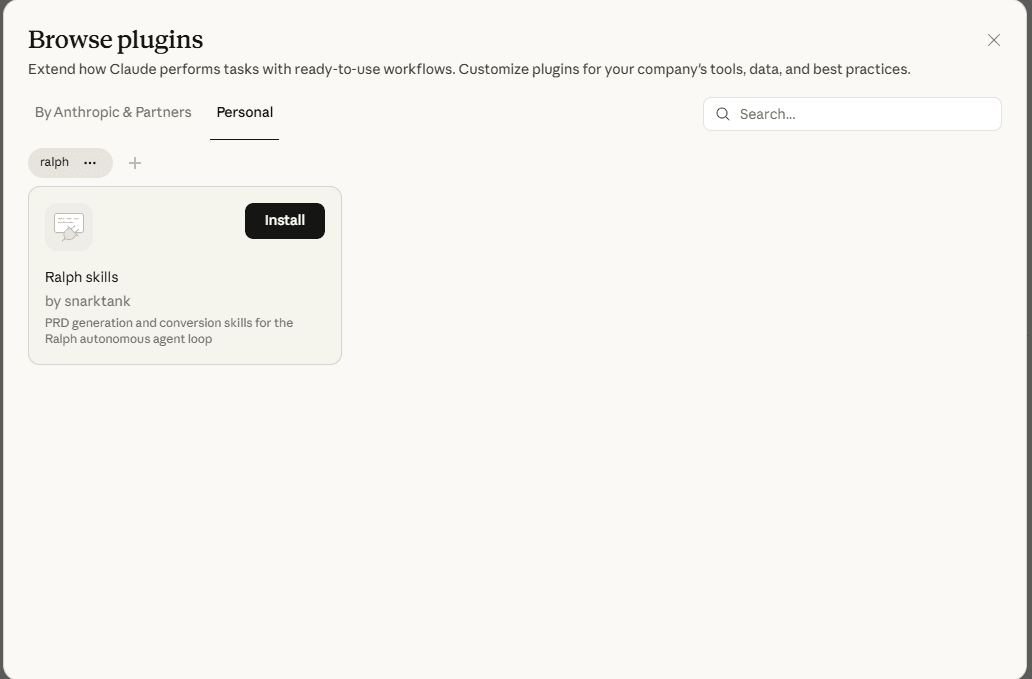
3. Find “Ralph skills” by snarktank and click Install
Step 2. Give it a job
Let's tell Ralph to completely redesign our cat website into a futuristic cyberpunk theme. The /ralph-skills:ralph command calls the connector, everything after it is your project description in plain English.
/ralph-skills:ralph we have a cat website, I want you to change it to a futuristic cat website, dont stop until you can see the website is now 100% cyberpunk style
Ralph will convert that into a structured PRD with ordered user stories. Once the plan is ready, execute it:
ralph.sh commence
What happens next
The /ralph-skills:ralph command converts your plain-English request into a structured prd.json with ordered user stories. Then ralph.sh commence tells Claude to execute them one by one, verifying in the browser after each story before moving to the next, and it doesn't stop until all stories pass.
You can swap in any project description after /ralph-skills:ralph and it'll plan + build it autonomously.
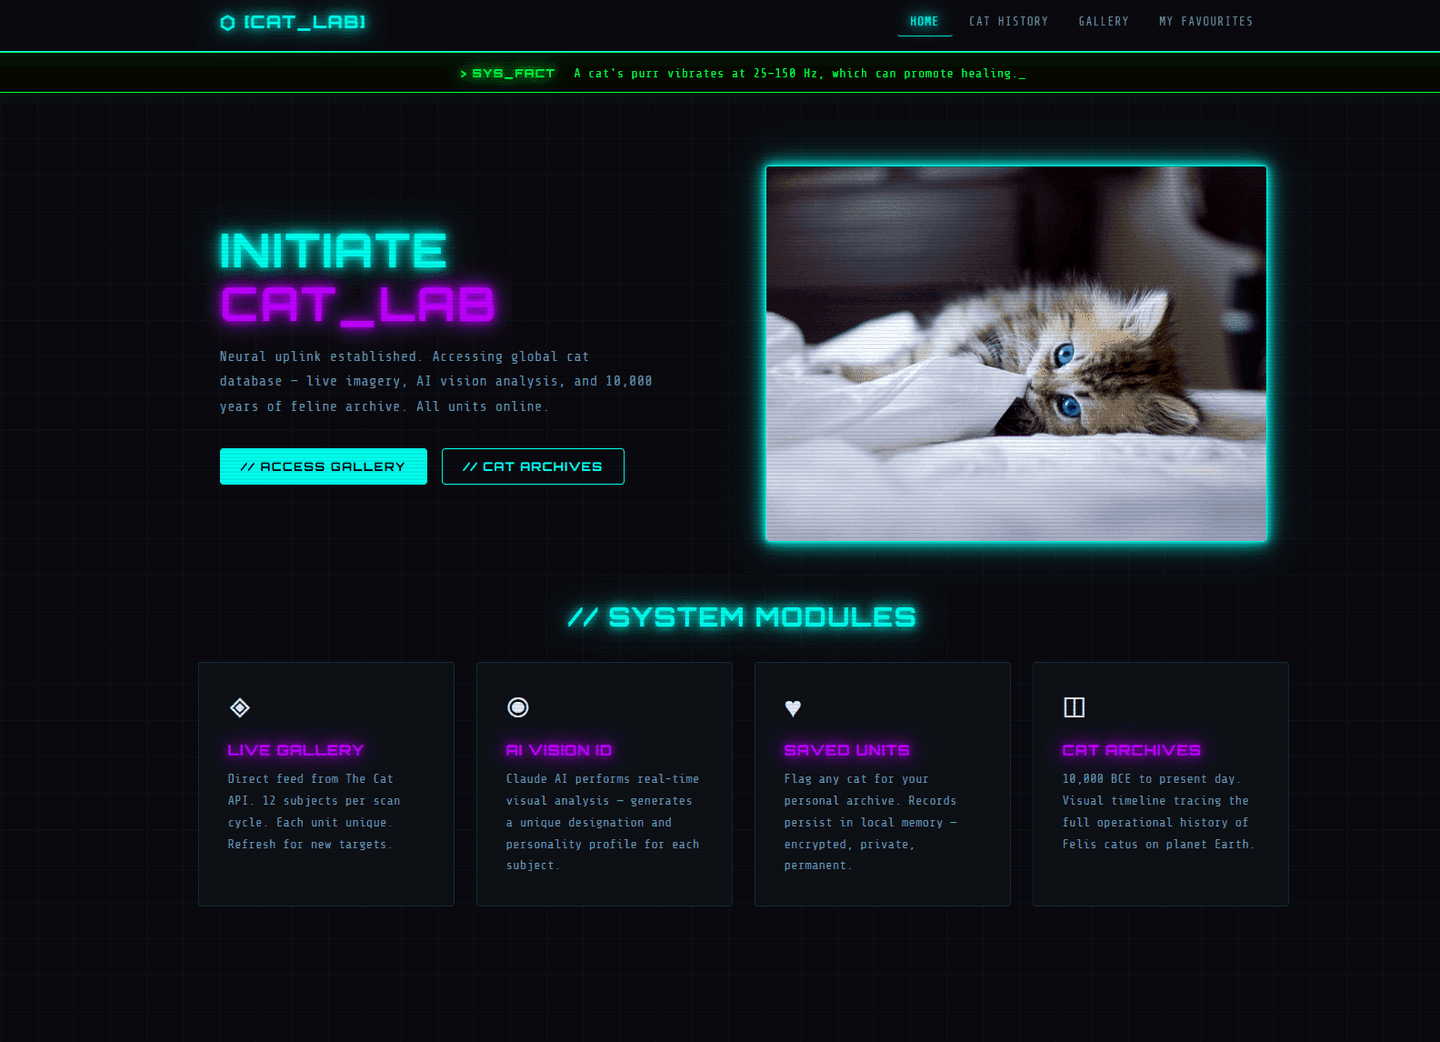
The result: Ralph autonomously redesigned the entire cat website into cyberpunk style.
Bonus: Launch Your Site Live
Right now your website only runs on your computer. Let's put it on the internet so anyone with a link can see it. You need two things:
GitHub, your online backup
Think of GitHub as a cloud backup for your code. Every change you make gets saved there, so you never lose your work. It also lets other tools (like Vercel) pull your latest code automatically.
Vercel, makes it live
Vercel takes your website code and puts it on a real URL that anyone can visit. Any app or website you build can go live here, for free on their hobby plan. Every time you push changes, it automatically updates.
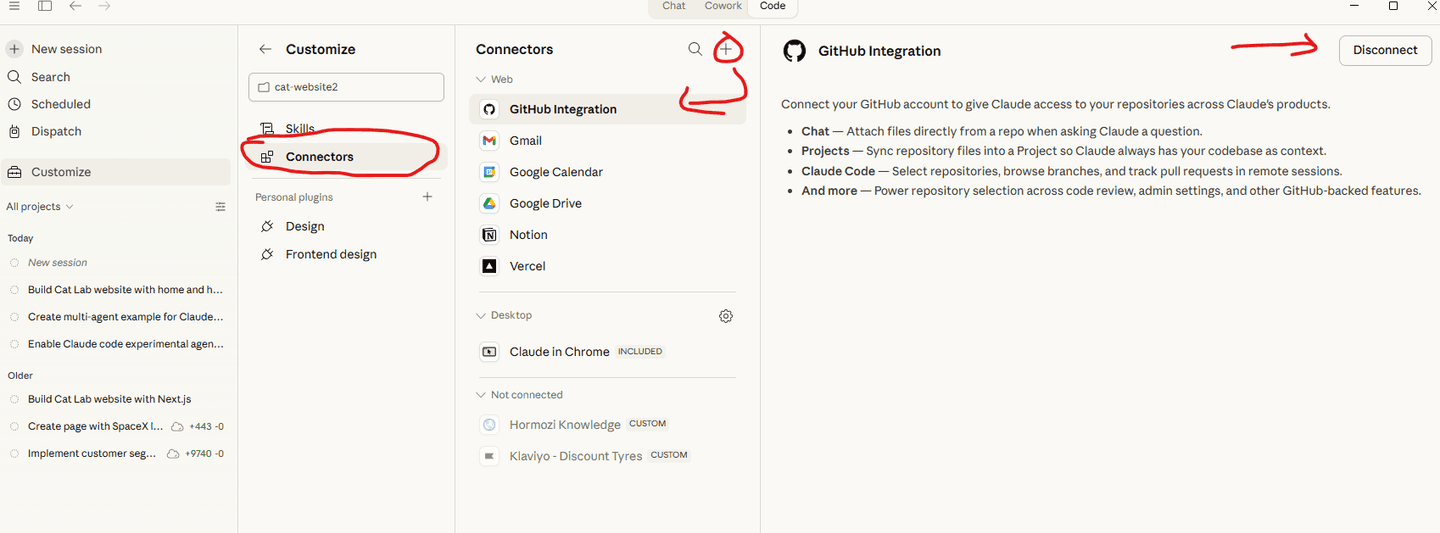
Step 1. Connect GitHub
In Claude Code desktop, go to Customize → Connectors and connect your GitHub account. Sign in with your GitHub or email, once connected, Claude can create repositories and push your code.
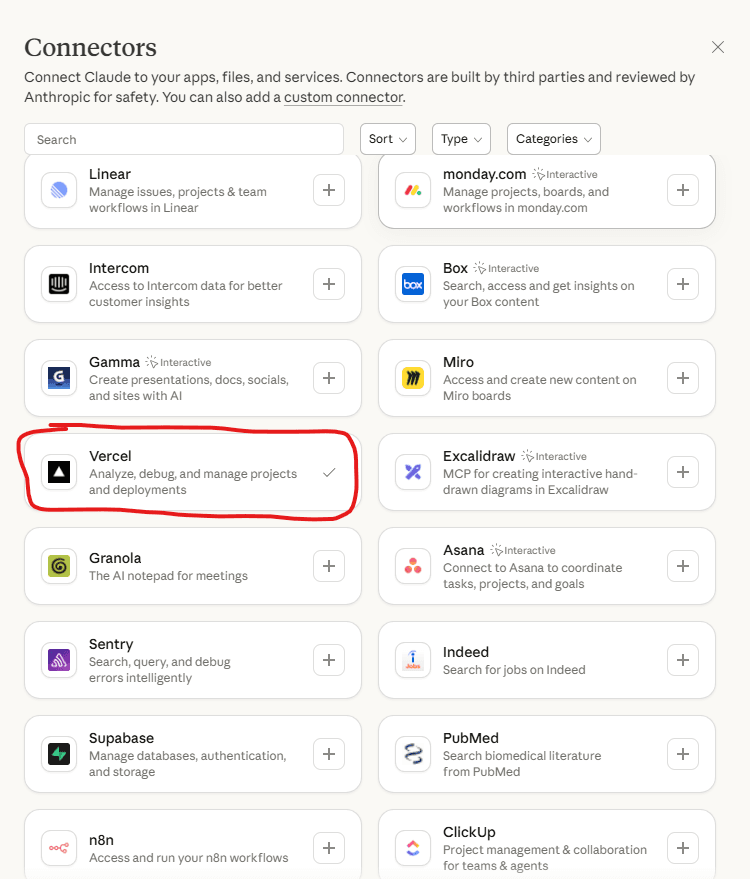
Step 2. Connect Vercel
In the same Connectors panel, find Vercel and connect it. You can sign up for a free Vercel account using your GitHub login.
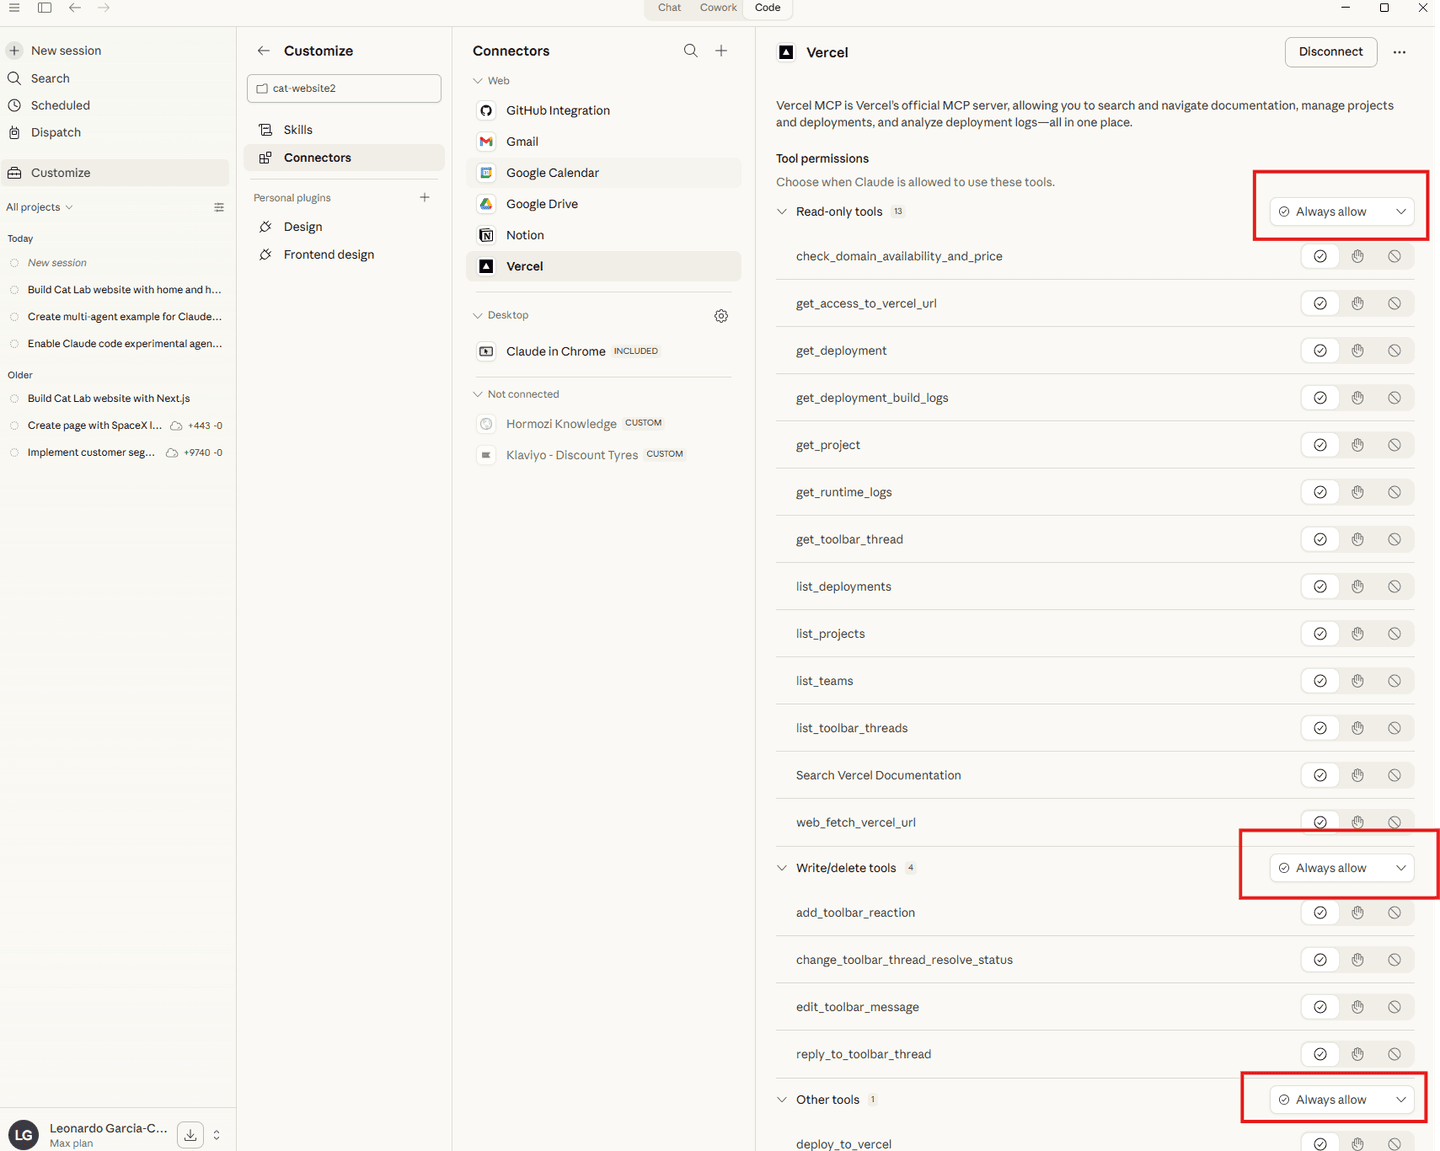
Once connected, set the Vercel tools to Always allow so Claude can deploy without asking permission each time.
Step 3. Deploy
Now just tell Claude Code what you want:
Push this project to a new GitHub repository called cat-website, then deploy it to Vercel so it's live on the internet.
Claude will create the repo, push your code, connect it to Vercel, and give you a live URL. Share it with anyone.
The key lesson
You went from an empty folder to a live website on the internet, without writing code, without touching a terminal, without configuring servers. Connectors let Claude talk directly to services like GitHub and Vercel on your behalf.
Bonus: Stop the Permission Popups
Tired of Claude Code asking “Can I edit this file?” every time? You can tell it to auto-approve common actions for this project. Tell Claude Code:
Create a .claude/settings.local.json file in this project with permissions to auto-approve reading, writing, editing files, running commands, web searches, and launching agents. Deny dangerous commands like rm -rf and git push --force.
What it creates
A file at .claude/settings.local.json in your project:
{
  "permissions": {
    "allow": [
      "Bash(*)",
      "Edit",
      "Write",
      "Read",
      "WebFetch",
      "WebSearch",
      "Agent"
    ],
    "deny": [
      "Bash(rm -rf *)",
      "Bash(git push --force *)"
    ]
  }
}
This only applies to this project folder. Claude can now work freely without interrupting you for every action, while still blocking anything destructive.
Look at What You Just Built
Take a step back and realise what happened here.
You planned before you built
Plan mode taught Claude to think first. You reviewed the architecture before a single line of code was written. That's how real teams work.
You set up a local project from scratch
An empty folder became a full website running on your computer. Node.js, dependencies, file structure. Claude handled all of it.
You pulled data from an external API
The Cat API sends live cat photos to your website. This is the same pattern behind every app that shows weather, stock prices, maps, or social feeds.
You connected AI vision to your website
You sent an image to the Claude API and got back intelligent analysis. The same technology can read receipts, analyse products, review documents, or inspect anything visual.
You saved data in the browser
Favourites persist between visits using localStorage. This is how apps remember your preferences, shopping cart, and settings without a database.
You managed a team of AI agents
A team of agents coordinated as peers, the reviewer shared findings, the designer and developer agreed on structure before building. Real collaboration, not just parallel work.
Now Think Bigger
You built a cat website. But the skills you used today work for anything:
An internal tool that reads invoices with AI vision and auto-fills your accounting software
A customer portal that pulls data from your CRM via API and shows it on a dashboard
A product catalogue that lets customers search with natural language
An employee onboarding site that generates personalised training plans
A reporting tool that pulls analytics from multiple APIs into one view

You built an entire website in plain English.
The only limit is what you can describe.
Start with Claude Cowork
Cowork is for documents and tools. Code is for building apps. Both start with the same principle, setup over prompting.
← Go to Cowork Guide